If you’re familiar with automated testing in Ruby on Rails you’ve probably heard about factory_bot (formerly known as factory_girl). It is a library for defining factories that can be used to create data during tests.
Using factory_bot in Ruby, defining a factory can be done like so:
factory :country do
  name "Denmark"
  code "DK"
end

factory :city do
  name "Copenhagen"
  country
end
In tests you can then use your Ruby factories like so:
city = create :city
country = create :country, city: city

expect(country.city).to eq city
The majority of the tests in our Ruby on Rails API’s test suite uses factories so now that we’re looking to transition part of our backend setup to Rust we needed a similar library there. We did some digging but found no libraries that integrated with Diesel. So naturally we decided to create our own! Version 0.1 of that was released a couple of weeks ago and we’re already using it quite a bit internally. In this blog post I would like to introduce it and show how we’re using it in our tests.
The crate is called “diesel-factories” and you can find it on crates.io here.
Defining factories
Factories in diesel-factories are just normal structs, which implement the Factory trait. You’re free to implement this trait manually, but the library also provides a “derive macro” which we recommend you use.
Here are the two Ruby factories shown above converted to Rust:
#[derive(Clone, Factory)]
#[factory(model = "Country", table = "countries")]
struct CountryFactory {
    pub name: String,
    pub code: String,
}

#[derive(Clone, Factory)]
#[factory(model = "City", table = "cities")]
struct CityFactory<'a> {
    pub name: String,
    pub country: Association<'a, Country, CountryFactory>,
}
Association<'a, Country, CountryFactory> means that a CityFactory has an association to a either a Country or a CountryFactory. More on that later.
For setting the default values for each field we use the Default trait from the standard library:
impl Default for CountryFactory {
    fn default() -> Self {
        Self {
            name: "Denmark".to_string(),
            code: "DK".to_string(),
        }
    }
}

impl<'a> Default for CityFactory<'a> {
    fn default() -> Self {
        Self {
            name: "Copenhagen".to_string(),
            country: Association::default(),
        }
    }
  }
It is totally possible to derive these implementations with another “derive macro” but that isn’t something we have explored yet. If you think it’d be a good feature, we always welcome pull requests.
Using factories
Using the factories could looks like this:
let country = CountryFactory::default().insert(&db);
let city = CityFactory::default().country(&country).insert(&db);

assert_eq!(country.city_id, city.id);
Where db is a Diesel database connection, PgConnection in our case.
Lets unpack what is going on here.
let country = CountryFactory::default().insert(&db);
This line creates a new CountryFactory instance using the Default implementation we wrote. .insert(&db) will then insert that country into the database. This method is defined on the Factory trait so the code for that is generated by #[derive(Factory)].
The next line looks similar:
let city = CityFactory::default().country(&country).insert(&db);
However since we want the city to be associated with the country we just created we call .country(&country). This will set the city’s country to &country. If we didn’t do this the city would get its own new country implicitly. This new country gets set on this line in CityFactory’s implementation of Default:
country: Association::default()
In this case Association::default() is a shorthand for Association::Factory(CountryFactory::default()).
Factories automatically track if their associations have been inserted or not. So calling .insert on a CityFactory that has a CountryFactory that hasn’t been inserted yet will automatically insert the country as well.
You can also override other default values by calling builder style methods:
CountryFactory::default()
    .name("Germany")
    .code("DE")
    .insert(&db)
These methods are also generated by #[derive(Factory)].
Defining more defaults
One of the benefits of factories being regular structs is that we can add methods to them. For example at Tonsser we often name test users Bob, Alice, or Cindy. We can easily wrap that up in a couple of methods like so:
impl UserFactory<'_> {
    pub fn bob() -> Self {
        Self::default()
            .slug("bob-bobsen")
            .first_name("Bob")
            .last_name("Bobsen")
    }

    pub fn alice() -> Self {
        Self::default()
            .slug("alice-alicesen")
            .first_name("Alice")
            .last_name("Alicesen")
    }

    pub fn cindy() -> Self {
        Self::default()
            .slug("cindy-cindysen")
            .first_name("Cindy")
            .last_name("Cindysen")
    }
}
We can then call those methods like so:
let bob = UserFactory::bob().insert(&db);
let alice = UserFactory::alice().insert(&db);
let cindy = UserFactory::cindy().insert(&db);
This feature is called “traits” in factory_bot but we get it for free since we don’t use a DSL for defining factories.
Conclusion
In our Rust test suite we already have 14 of these factories and so far we’re very happy with how they work. I invite you checkout the documentation for diesel-factories if you want to know more.
At Tonsser we believe strongly in the value of open source and have been working on various GraphQL related libraries of the last couple of months. Namely juniper-from-schema and juniper-eager-loading. If you’re interested in Rust and GraphQL I highly encourage you to check them out. You’re also welcome to reach out to me on Twitter if you want to know more.
Have you ever heard about the “turbofish”? It is that piece of Rust syntax that looks like ::<SomeType>. In this post I will describe what it does and how to use it.
First of, if you were to write something like this:
fn main() {
    let numbers: Vec<i32> = vec![
        1, 2, 3, 4, 5, 6, 7, 8, 9, 10,
    ];

    let even_numbers = numbers
        .into_iter()
        .filter(|n| n % 2 == 0)
        .collect();

    println!("{:?}", even_numbers);
}
The compiler would yell at you with the following message:
$ cargo check
    Checking blog-post v0.1.0 (/Users/davidpdrsn/Desktop/blog-post)
error[E0282]: type annotations needed
 --> src/main.rs:6:9
  |
6 |     let even_numbers = numbers
  |         ^^^^^^^^^^^^
  |         |
  |         cannot infer type
  |         consider giving `even_numbers` a type

error: aborting due to previous error

For more information about this error, try `rustc --explain E0282`.
error: Could not compile `blog-post`.

To learn more, run the command again with --verbose.
What this message says is that it doesn’t know what type you’re trying to “collect” your iterator into. Is it a Vec, HashMap, HashSet, or something else that implements FromIterator?
This can be fixed in two different ways. Either by declaring the type of even_numbers when you declare the variable:
let even_numbers: Vec<i32> = ...
Or by using a turbofish:
let even_numbers = numbers
    .into_iter()
    .filter(|n| n % 2 == 0)
    .collect::<Vec<i32>>();
The ::<Vec<i32>> part is the turbofish and means “collect this iterator into a Vec<i32>”.
You can actually replace i32 with _ and let the compiler infer it.
let even_numbers = numbers
    .into_iter()
    .filter(|n| n % 2 == 0)
    .collect::<Vec<_>>();
The compiler is able to do that because it knows the iterator yields i32s.
With this change our final program looks like this:
fn main() {
    let numbers: Vec<i32> = vec![
        1, 2, 3, 4, 5, 6, 7, 8, 9, 10,
    ];

    let even_numbers = numbers
        .into_iter()
        .filter(|n| n % 2 == 0)
        .collect::<Vec<_>>();

    println!("{:?}", even_numbers);
}
Now the compiler is happy:
$ cargo check
    Checking blog-post v0.1.0 (/Users/davidpdrsn/Desktop/blog-post)
    Finished dev [unoptimized + debuginfo] target(s) in 0.28s
When the turbofish can be used
Lets look at another, similar example:
fn main() {
    let s = "Hello, World!";
    let string = s.into();
}
Compiling this gives us an error similar to what we had before:
$ cargo check
    Checking blog-post v0.1.0 (/Users/davidpdrsn/Desktop/blog-post)
error[E0282]: type annotations needed
 --> src/main.rs:3:9
  |
3 |     let string = s.into();
  |         ^^^^^^
  |         |
  |         cannot infer type
  |         consider giving `string` a type

error: aborting due to previous error

For more information about this error, try `rustc --explain E0282`.
error: Could not compile `blog-post`.

To learn more, run the command again with --verbose.
We might assume that we fix this by using the turbofish again like so:
fn main() {
    let s = "Hello, World!";
    let string = s.into::<String>();
}
However that gives us a new error:
$ cargo check
    Checking blog-post v0.1.0 (/Users/davidpdrsn/Desktop/blog-post)
error[E0107]: wrong number of type arguments: expected 0, found 1
 --> src/main.rs:3:27
  |
3 |     let string = s.into::<String>();
  |                           ^^^^^^ unexpected type argument

error: aborting due to previous error

For more information about this error, try `rustc --explain E0107`.
error: Could not compile `blog-post`.

To learn more, run the command again with --verbose.
When I was still new to Rust this error confused me a lot. Why does ::<> work on collect but not on into? The answer is in the type signatures of those two functions.
collect looks like this:
fn collect<B>(self) -> B
And into looks like this:
fn into(self) -> T
Notice that collect is written as fn collect<B> and into is written as just fn into.
The fact that collect has a generic type <B> is what allows you to use ::<>. Had into somehow been written as fn into<B> then you would have been able to write .into::<String>(), but since it isn’t, you can’t.
If you encountered a function like fn foo<A, B, C>() then you would be able to call it like foo::<String, i32, f32>().
The turbofish can also be applied to other things such as structs with SomeStruct::<String>::some_method(). This will work if the struct is defined as struct SomeStruct<T> { ... }.
You can almost think of the things inside ( and ) to be the “value arguments” to a function and the things inside ::< and > to be the “type arguments”.
So to fix our code from above we would have to declare the type when declaring the variable:
fn main() {
    let s = "Hello, World!";
    let string: String = s.into();
}
And again the compiler is now happy:
$ cargo check
    Finished dev [unoptimized + debuginfo] target(s) in 0.04s
We can technically also use the fully qualified trait syntax:
fn main() {
    let s = "Hello, World!";
    let string = <&str as Into<String>>::into(&s);
}
Or optionally
fn main() {
    let s = "Hello, World!";
    let string = Into::<String>::into(s);
}
I would personally just use give s a type check declaring the variable in this case.
I recommend you check out the the book if you want to learn more about how generics work in Rust.
By the way after some digging I found this reddit comment to be the origin on the word “turbofish”.
In tech, deadlines are everywhere. Feature deadlines, milestone deadlines, testing deadlines. If you give a group of engineers infinite time, you’ll come back 5 years later to find them still arguing over the the best technology, so I don’t think time pressure is going away anytime soon.
The experience
After a mammoth coding session, you smash out that last line of code and push it into the CI system. Finally, feature complete. You’ve been absolutely giving it your all, the big internal demo is tomorrow, but you’ve just finished the last piece of the puzzle, you’re fre… Red. Somewhere in the horribly convoluted realm of code compiling other code to make machines orchestrate other machines, that should eventually, somehow, let the customer reset their password to “Password1!”, some 0s have been set to 1s, and your carefully balanced house of cards has come crashing down. People are starting to leave the office. You sigh. Just getting to this point has been utterly exhausting. Time for coffee number five. It’s going to be a long night…
Why does this happen?
Because writing code without bugs is pretty much impossible. Because people are eternal optimists. Because capitalism. Because you, despite thinking about it more and more over the past few months, haven’t yet run off to take up goat-farming in Croatia.
Possibly this isn’t a helpful line of enquiry. Let’s try something else.
How do we stop it?
Work less hard. Try to work at 70% of what you think you can do. Don’t stay late. When things go wrong, you’ll have a spare 30% to throw at the problem. This only works if your organisation has leadership that values output, rather than effort, but I’d argue most places that value effort over results don’t have a very bright future anyway.
On the other hand, if you’re working at 100% of capacity (and “give it your all” is such a seductive phrase), this is going to get baked into everyone’s ideas about what is possible. You’ll end up staying late when things go wrong. Doing dodgy hacks. Adding tech debt. In the above scenario, if the demo works because you stayed late, the organisation will think the answer is “have the devs stay late”, and the cycle will start anew. Except next time, you’ll have to build on top of the tech debt filled garbage code you wrote at midnight. It will only get harder each time, as sleep deprivation and the deteriorating codebase take their toll.
Getting there
The hardest part is transitioning between a schedule that assumes 100%, and one that assumes 70%. This is usually a pretty hard sell. In my experience the best way to achieve this is to relentlessly cut features (although you should always phrase this as “we’ll move that to version 2.0”). When given a woefully unrealistic deadline, say something like “I will do my best to meet this ambitious target”. Always call it a target, whenever you talk about it. This can be astonishingly effective at getting through to people.
For those of you who like sources, there are rich veins of research that show working long hours is counterproductive. Here’s an overview, there’s also a paper on productivity implications, and health and wellbeing implications. There’s also a fascinating study around work intensity.
The takeaway
Work less: you’ll get more done. And be healthier and happier, to boot.
When we started developing the Tonsser API we decided to give test driven development (TDD) a shot and see how it went. This decision was mostly lead by the fact that the Ruby community is very pro testing and speaks very highly of its benefits.
It has now been 4 years and we’re still all in on TDD. I strongly believe the reason we have such a solid API is because testing is a core part of our workflow.
I really don’t know how I would work without tests. When you’re building a web app you can test it manually by clicking around in the browser. When you’re building an API things aren’t so simple. You would have to use curl or Postman, which would get tedious quickly. And I can’t imagine manually testing a complex flow containing a mix of GET, POST, and PATCH calls.
With automated tests we are able to setup exactly the state we need, call one or more endpoints, and make assertions about the JSON we get back. Here is what a typical integration test looks like:
describe "GET /me" do
  it "returns a user's name" do
    user = create :user

    get_as_user user, "/me"

    expect(json.response.name).to eq user.name
  end
end
At the time of writing we have over 4000 tests and more than 95% test coverage. That means shipping stuff that breaks something else happens very rarely. Our productivity has also not declined overtime as the app has grown, and our code isn’t a “big ball of mud”. I still enjoy building new features as much as I did in the first month.
Another important benefit of testing is how it allows us to refactor relentlessly. You rarely get stuff right the first time and things always change when you’re in a fast moving startup. Our strong focus on testing supports that well by allowing us to safely refactor large fundamental systems such as deep linking and ditching ActiveModelSerializers.
The hardest part about testing is always selling it to managers. It is easy to think that writing tests will slow you down because you have to spend time writing both test and implementation code. But this view is very short-sighted. Testing actually increases productivity because you’ll be spending less timing fixing things you broke by accident. It of course helps to have done TDD from day one and to use a framework like Ruby on Rails which has great built in support for testing.
One of the downsides of having lots of tests is that you sometimes have to spend time updating them. If 100 tests depend on some object, and that object changes, you have to update your tests. That is sometimes a bit tedious but the trade-off is well worth it. I’m also sure the time saved by having tests is greater than the time spent updating them.
We currently have lots of open positions in tech so if you like our approach to testing I encourage you to check them out at tonsser.com/jobs.
In this blog post I will go through the tech architecture in Tonsser and how the different parts integrates with each other. I will also dig more into the Tonsser API, which I’m responsible for. Lets start with going through each of the tech environments as shown in the image below.
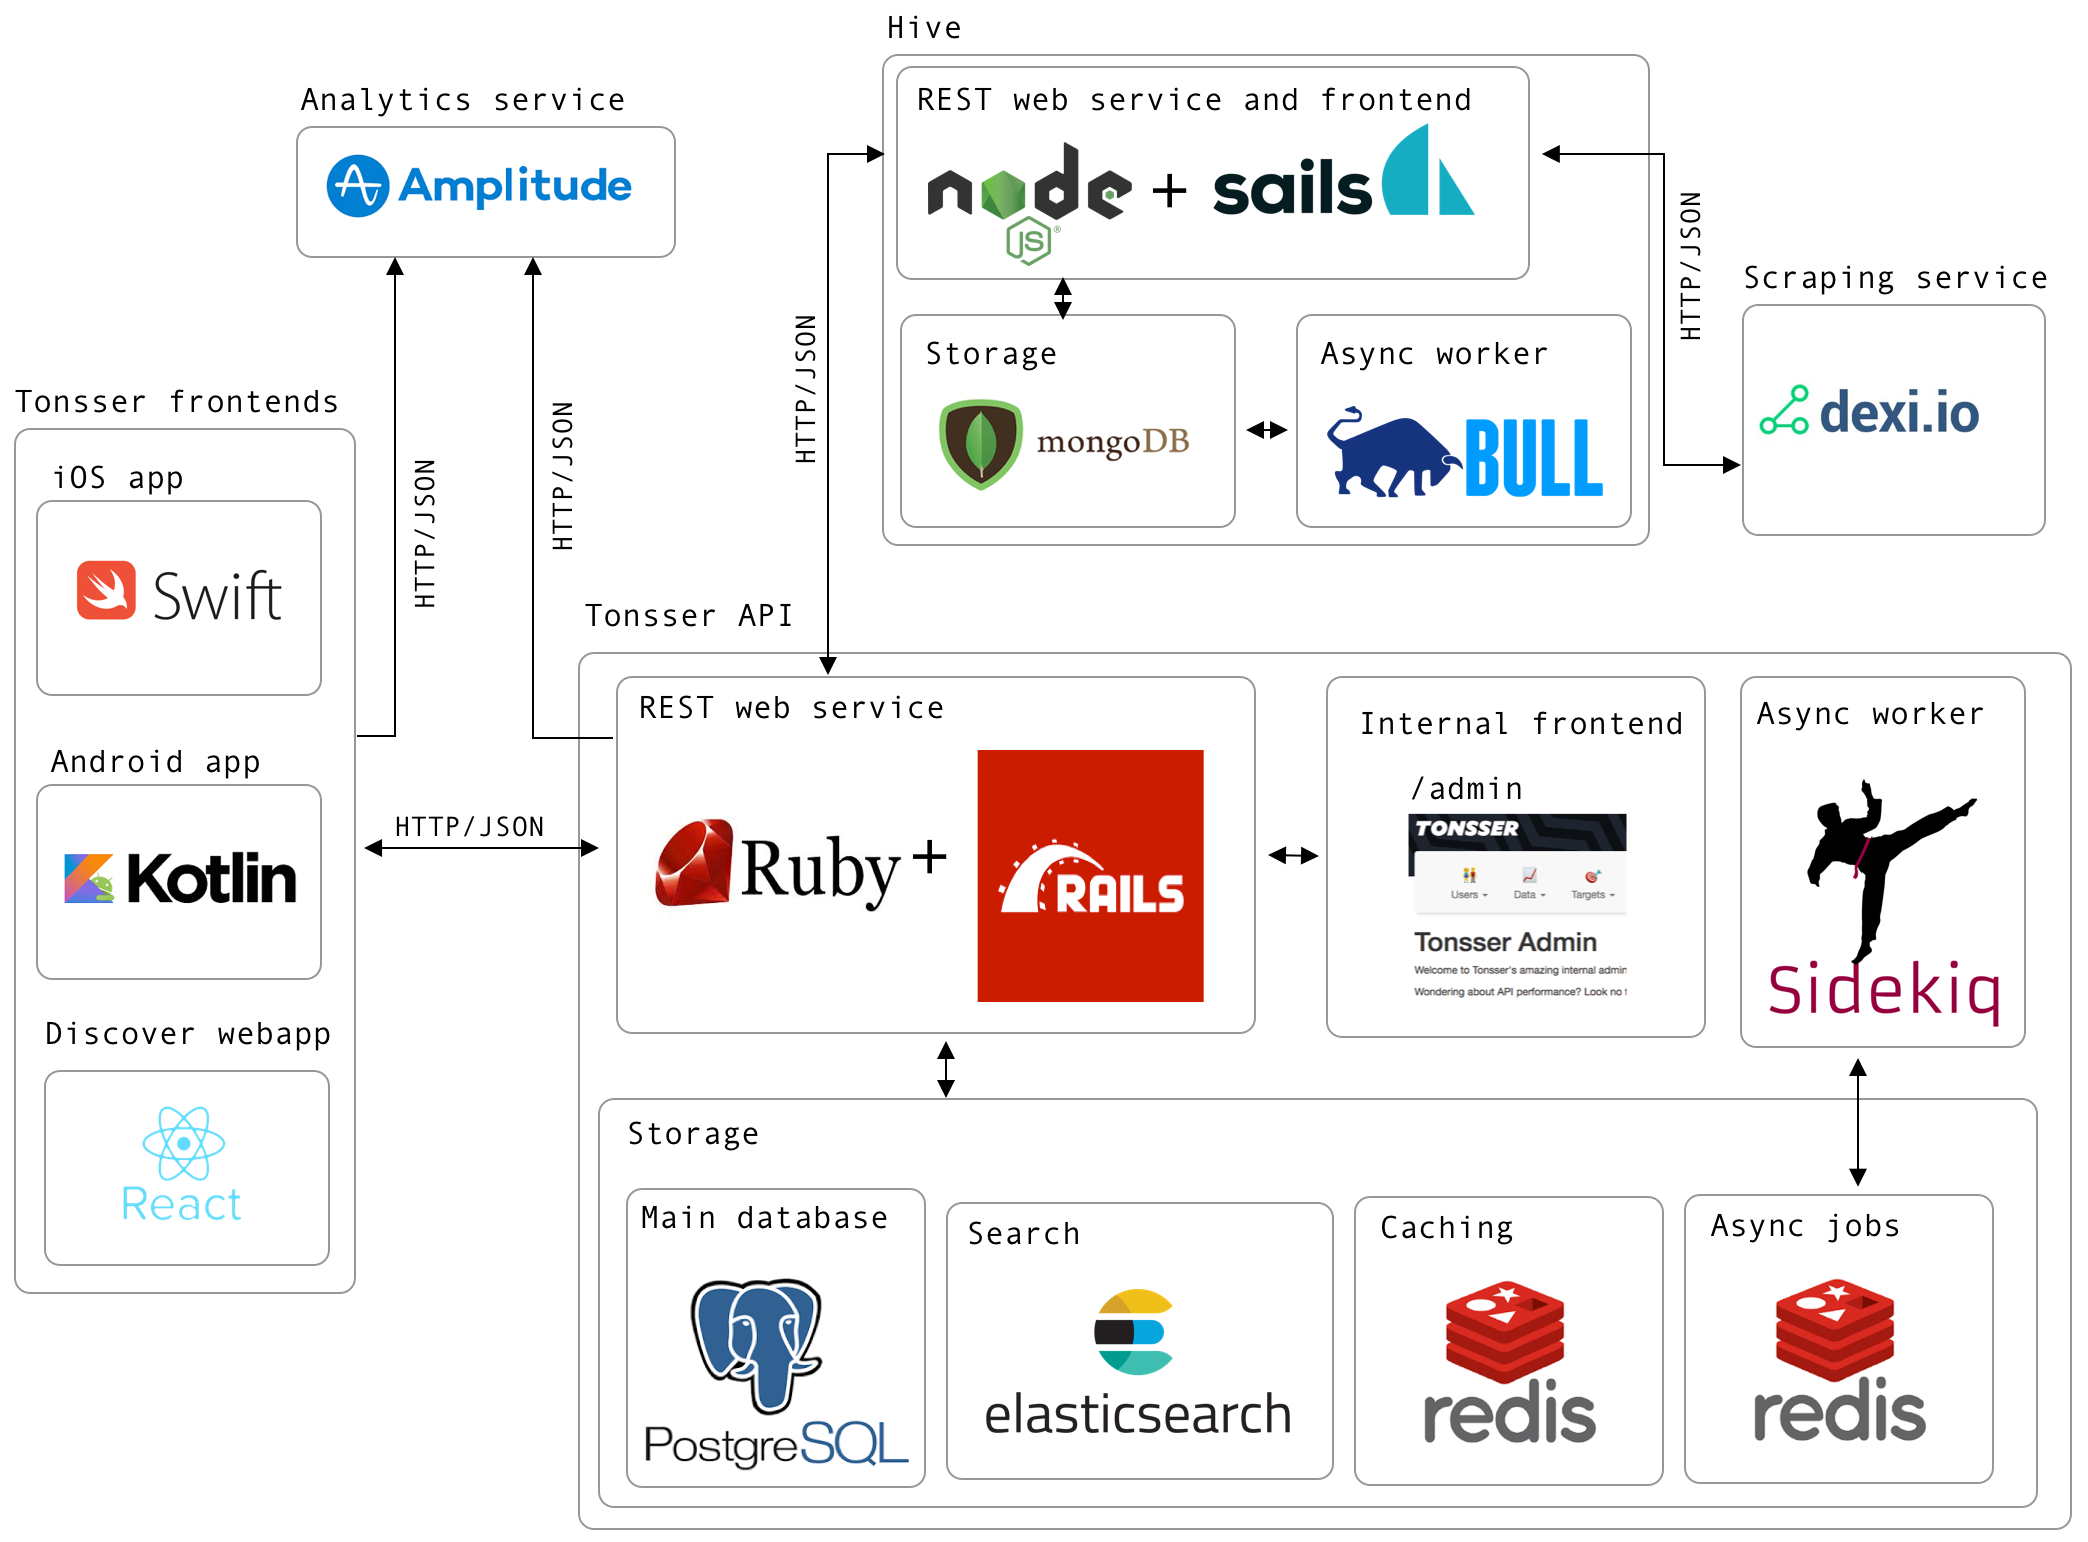
Tonsser frontends
We have several frontends in Tonsser. Our iOS and Android mobile apps have been there for a long time, so they are heavy users of the Tonsser API. The communication between the clients and the API happens through HTTP, in this case using REST with JSON payloads. The iOS app is basically written 100% in Swift, whereas the Android team started transitioning the app from Java to Kotlin around a year ago. That codebase is currently 50% Kotlin and 50% Java.
Most of the traffic to the API happens through mobile apps as this is how our users log their football data. At the time of writing we have around 870K users registered in the database.
In 2018 we started to build a web app in React called Discover, which also integrates with the API in the same way as the mobile apps. Discover is a product that is focussed on the clubs and scouts, which means it has less users and thereby doesn’t generate the same amount of traffic to the API.
Tonsser API
The Tonsser API, which is what I’m mainly working on, is created in Ruby on Rails. Since the start, we have embraced TDD, which in retrospect was one of the best decision we have made in the backend team. Why that is, you can read more about here.
As already stated the Ruby on Rails app is mainly working as a REST API for all our Tonsser frontends, but it also integrates with our scraping system (called Hive), which I will discuss later in this post.
Besides the REST API for the frontends, we also have an internal admin web app in the API.
This web app is used internally in the company for many different things.
Our primary datastore in the API is Postgres, as our data model is relational. However we also utilize the NoSQL like storage in Postgres, in this case raw JSON, for notifications and the feed.
Besides the Postgres database, we also use Redis for both caching and storing async jobs. For processing these jobs we use Sidekiq, as it utilizes threads, meaning we can run many jobs at the same time in the same process.
At last we use Elasticsearch for general search in the app. Primarily for user search and finding club/teams.
Since we are embracing TDD, we also like automation to achieve high productivity. Every time a commit is pushed to one of our git branches, the new code is automatically run through our CI pipeline on CircleCI. Deployments happen automatically if the tests are all green.
The app is hosted on Heroku, but we also use some AWS services, such as S3, SNS and ElasticTranscoder. For monitoring we use NewRelic and Librato.
Digging more into the Tonsser API
Here are some high level numbers to get an idea of the size and scale of Tonsser API today
- The API team is just me and David
- Over 4000 unit and integration tests
- Over 100k LoC, hence stuff inside of
/app of our Rails project.
- PostgreSQL database
- 160GB of data
- 143 tables with around 342 million rows
- We currently use a Standard 5 database on Heroku
- At peak hours, we hit around 15K RPM, hence 250 req/s hitting the rails web service.
- To sustain this load, we use around 8 PL dynos
- We use Rails autoscale addon on Heroku to automatically scale dynos based on time in request queue, as our traffic fluctuates a lot.
- At peak hours our average response times is around 200ms and 95th percentile 500ms.
- At peak hours we can hit 10K RPM sidekiq jobs running.
- We have 3 different sidekiq processes running
- One for sending notifications
- One for nuking caches
- One for all other background jobs.
Analytics service
Tonsser is a very data-driven company, which means we track a lot of data on how our users are using our products. Especially on the mobile apps, as that is where the main interaction is.
We use a third party service called Amplitude, where we basically store all types of event data. Here we can easily build various dashboards and charts to understand how we can improve our product.
Dexi
The main foundation of Tonsser is scraping. We scrape all the relevant football federations sites in the countries we are in. This basically means, that when a user signups in our product, they can expect to find the team they are playing on in real life and all its related data, hence matches for the team, opponent teams etc.
We use a third party service called Dexi to handle all the scraping, hence running/building robots to scan and extract the necessary information from the football sites. Dexi integrates directly with Hive via webhooks.
Hive
Hive (Not Apache Hive), is the system that makes sure the Tonsser API is always in sync with what is present on the football sites. Meaning if something gets deleted, changed or created on any of the football sites, it is Hive’s job to forward this to the API.
Hive is currently built in NodeJS, uses MongoDB for storage due to the nature of scraped data.
Summing up
I could have gone in much more detail around the whole tech architecture and specifically stuff in the Tonsser API. However, if you want to know more about how we did certain stuff in the API, you are more than welcome to ask me, as it could be a good start for another blog post :)
Have you ever tried defining a method in irb? If so you might have noticed that doing so returns the name of the method:
$ irb
>> def foo
>>   end
=> :foo
That turns out to be useful. Allow me to paint you a picture:
Imagine that you have a class with a method you would like to benchmark
class SomeClass
  def some_method
    puts "running code"
  end
end
For this simple example it obviously wouldn’t be interesting to benchmark #some_method but imagine this method did lots of complicated and possibly slow things.
A quick way to add benchmarking to this class could be
require "benchmark"

class SomeClass
  def some_method
    benchmark(:some_method) do
      puts "running code"
    end
  end

  private

  def benchmark(method)
    return_value = nil
    time = Benchmark.realtime { return_value = yield }
    ms = (time * 1_000).round(10)
    puts "#{method} took #{ms} ms"
    return_value
  end
end
Here we add a #benchmark method that takes the name of the method we’re benchmarking and a block. It will then run the block and measure how long time it takes. The time is printed to the screen and the return value of the block is returned.
Benchmarking methods in this way is probably something we’ll want to do a lot, so lets pull it out into a reusable module
module Benchmarking
  def benchmark(method)
    return_value = nil
    time = Benchmark.realtime { return_value = yield }
    ms = (time * 1_000).round(10)
    puts "#{method} took #{ms} ms"
    return_value
  end
end

class SomeClass
  include Benchmarking

  def some_method
    benchmark(:some_method) do
      puts "running code"
    end
  end
end
This is better, but having benchmark do ... end in all your methods is a bit noisy. Something like this would be nicer
def some_method
  puts "running code"
end
benchmark :some_method
This is similar to the helper_method method found in Rails controllers.
The code to accomplish that is
require "active_support/concern"

module Benchmarking
  extend ActiveSupport::Concern

  module ClassMethods
    def benchmark(method)
      aliased_name = "__unbenched_#{method}__"
      alias_method aliased_name, method
      define_method(method) do |*args|
        benchmark(method) { send(aliased_name, *args) }
      end
      method
    end
  end

  def benchmark(method)
    return_value = nil
    time = Benchmark.realtime { return_value = yield }
    ms = (time * 1_000).round(10)
    puts "#{method} took #{ms} ms"
    return_value
  end
end

class SomeClass
  include Benchmarking

  def some_method
    puts "running code"
  end
  benchmark :some_method
end
Our approach here is to redefine #some_method to do what it did originally, but wrap the body in benchmark(:some_method) do ... end. This is done by aliasing #some_method to a new method called #__unbenched_some_method__. This effectively creates a new method with this new funky name, but with the old body.
We then define a new method with the original name that calls our aliased method while wrapping that call in benchmark.
You can imagine the resulting code looking like this
class SomeClass
  include Benchmarking

  def some_method(*args)
    benchmark(:some_method) do
      send(:__unbenched_some_method__, *args)
    end
  end

  def __unbenched_some_method__
    puts "running code"
  end
end
The reason we need ActiveSupport::Concern is because that is the easiest way to add both class and instance methods with a single module.
This works well but it has one issue: We have to type some_method twice
def some_method
  puts "running code"
end
benchmark :some_method
We can fix this by abusing the fact that def some_method ... end returns :some_method. That means we can actually just write
benchmark def some_method
  puts "running code"
end
Our end result it
require "benchmark"
require "active_support/concern"

module Benchmarking
  extend ActiveSupport::Concern

  module ClassMethods
    def benchmark(method)
      aliased_name = "__unbenched_#{method}__"
      alias_method aliased_name, method
      define_method(method) do |*args|
        benchmark(method) { send(aliased_name, *args) }
      end
      method
    end
  end

  def benchmark(method)
    return_value = nil
    time = Benchmark.realtime { return_value = yield }
    ms = (time * 1_000).round(10)
    puts "#{method} took #{ms} ms"
    return_value
  end
end

class SomeClass
  include Benchmarking

  benchmark def some_method
    puts "running code"
  end
end
While this will probably look foreign to most Rubyists I would argue it is quite an elegant way to decorate methods.
A real world use case for this taken from Tonsser’s API is memoizing expensive methods. We have lots of code like this
class SomeClass
  include Memoize

  memoize def slow_method
    puts "running slow code"
  end
end
This is only possible because defining a method returns the name of that method.
Laziness is an important skill to have as a developer. For me laziness is the key driver behind automation and workflow optimisation. Over the past couple of months I have channeled my laziness into building command-line utilities to automate common or tedious tasks. In this post I will talk about which tools I use to build CLIs (command-line interface) and some examples of tools I’ve built.
Rust
My language of choice for building CLIs is Rust, even though Ruby is by far the language I know the best. Rust is great for CLIs for a few reasons:
Strong types
I am a strong believer in test driven development, but for small command-line utilities I often don’t feel the need to have tests. However I have experienced coming back to something I wrote six months ago and having a hard time changing things because I didn’t write tests. Years of strict TDD makes you worried when changing code that isn’t tested.
With Rust I feel less need to have tests, because its type system is great and catches lots of silly mistakes you might otherwise deploy.
I have found it to be straight forward to make changes to Rust code I haven’t look at for a couple of months.
Precompiled binaries
Rust makes distributing your tools really easy, because it compiles to a static binary. That means if I compile something on macOS, I can send the binary to my colleagues (who also use macOS) and they can just run it right away. There is no need for them to install Rust and compile the tool themselves.
In the past I’ve used Ruby for CLIs but those of my colleagues who didn’t use Ruby daily had a hard time because installing Ruby on macOS isn’t trivial.
Parsing command-line arguments with structopt
Parsing command-line arguments is not easy. Imagine a fictional git workflow kind of tool that can merge branches. You can imagine calling it in the following ways:
gittool merge my-branch
gittool merge my-branch --into master
gittool merge --into master my-branch
gittool merge my-branch --into master --rebase
gittool merge --into master my-branch --rebase
gittool merge my-branch -rebase -i master
There is lots of complexity around subcommands, arguments, options that take one or more arguments, flags that don’t take arguments, and making sure that order doesn’t matter.
structopt is a Rust library that handles all that complexity for you in the most elegant way I have ever seen. Rather than having some complicated API for you to set which options your CLI has you just define a data type that represents your subcommands and arguments, and structopt will generate Rust code for parsing the arguments. Here is how you could implement the gittool merge command from above:
use structopt::StructOpt;

#[derive(StructOpt, Debug)]
#[structopt(name = "gittool")]
enum GitTool {
    #[structopt(name = "merge")]
    Merge {
        branch: String,

        #[structopt(
            short = "i",
            long = "into",
            default_value = "master")]
        into: String,

        #[structopt(long = "no-rebase")]
        no_rebase: bool,
    },
}

fn main() {
    let options = GitTool::from_args();
    println!("{:?}", options);
}
With Rust’s powerful code generation features, this really is all it takes. We can now call our tool like with gittool merge my-branch --into staging --no-rebase. Doing so will print Merge { branch: "my-branch", into: "staging", no_rebase: true }.
This means instead of dealing with parsing of command-line arguments, we just deal with a value of type GitTool which is a normal Rust enum.
It even generates awesome docs:
$ gittool -h
gittool 0.1.0
David Pedersen <david.pdrsn@gmail.com>

USAGE:
    gittool <SUBCOMMAND>

FLAGS:
    -h, --help       Prints help information
    -V, --version    Prints version information

SUBCOMMANDS:
    help     Prints this message or the help of the given subcommand(s)
    merge


$ gittool merge -h
gittool-merge 0.1.0
David Pedersen <david.pdrsn@gmail.com>

USAGE:
    gittool merge [FLAGS] [OPTIONS] <branch>

FLAGS:
    -h, --help         Prints help information
        --no-rebase
    -V, --version      Prints version information

OPTIONS:
    -i, --into <into>     [default: master]

ARGS:
    <branch>
Tonsser has several internal tools made in this way. Here are the ones we use the most:
api-git
api-git is a tool similar to the one I described above. We mostly use it to merge branches and deploy to our different environments. Calling api-git merge my-branch will do the following:
- Make sure the master branch is up to date
- Rebase master onto
my-branch, unless called with --no-rebase
- Merge
my-branch into master
- Push master so CI can run tests the deploy
- Merge
my-branch into our staging and development branches. Once these branches pass CI they will also be deployed
- Remove
my-branch locally and on GitHub
All this done with 21 Git commands.
Additionally if something fails at any point it will pause, tell you which step it was at, and let you fix the error. You can then continue running from the step it told you. Here is an example:
$ api-git merge my-branch
...

-- Running step 17: git merge --no-edit master
# stdout/stderr will appear here

Step 17 failed. Fix the problem and rerun with:

  api-git merge --no-rebase --into master my-branch --from-step 17

# manually fix the error
# continue where we left off with the command it gave us

$ api-git merge --no-rebase --into master my-branch --from-step 17
This tool doesn’t do anything fancy but it guarantees you that you’ll always merge in the correct way and that proper clean up will be done. I consider this tool an invaluable part of the backend team’s workflow.
phrase-upload-keys
We use PhraseApp to manage our translations. Their web UI is fine but for some reason there is no way to create lots of strings all at once. That means you have to do lots tedious clicking if some sprint requires 20 new strings.
So I made a small wrapper around their HTTP API which can create strings in bulk. It is open source and you can find the code here https://github.com/tonsser/phrase-upload-keys
This tool has become the primary way I add strings to PhraseApp and it has saved me thousands of clicks.
ci
ci is a small terminal dashboard for our CI service that shows build outcome for each of your local branches.
Running it looks like so:
~/dev/major/api 15:14:49 master@c3abfd8be
$ ci
some-other-branch ok
           master ok
          develop ok
          staging failed 15633
The 15633 is the build number, which I use for another tool which will find the tests that failed in a particular build. This means I basically don’t have to open CI in a browser, I can do everything through the terminal.
It currently only supports CircleCI, which is what the backend team uses. You can find the code here https://github.com/tonsser/ci-dashboard
If you want to see Tonsser’s other open source tools and libraries head over to https://github.com/tonsser. If you want to dive deeper into building CLIs with Rust I recommend the “Command line apps in Rust” book.